
Have you ever started a project but didn’t read the instructions and started at the wrong point? Or missed part of the information about something and was really confused? Or you kid is yelling at you at the most crucial line in the whole movie/TV show… fill in the blank. This happens to me all the time. And to be honest, it happens to a lot of people who are trying to become more prepared. The Emergency Preparedness Ladder is meant to help guide you through the 8 steps of emergency preparedness and progress you on your journey; tell you where to start, and where to go from.
Steps of Emergency Preparedness
Step 1: Know what emergencies you are at risk for.
This applies to BIG emergencies as well as small. You can read more about how to figure out exactly what you need to prepare for and download your free worksheet by going to my blog post last week.
5 Preparedness Class to get you better-prepared FAST
Step 2: Emergency Binder
Having an emergency binder is the second step… and probably the hardest step to take. It includes ALL of your personal information, financial, private property, and any other information that is important. But most of all, it also includes an “evacuation plan” and what your family’s plan is in case of an emergency.
I’m not gonna lie, it takes a lot of work to put one together… and a little work to update it. But 100% worth it if you need to evacuate for some reason (fire, flood, etc), and to have all of your important documents with you. It’s even worth it for non-emergencies.
I’ve got a free emergency binder printable download you can sign up for but I’ve also made life easy and made an Electronic Emergency Binder. This allows you to fill it all out on your computer/phone, and save multiple copies in various locations. The electronic version saves you time and is quick to edit and make changes. It also saves paper, from you having to re-print and edit items.

Step 3: 3 Day supply, 72 Hour Kit, or Bug Out Bag
This is a kit to aid in your survival for 3 days. It contains enough food, water, hygiene, and other items to keep you alive until help comes (about 3 days). If you live in an evacuation zone, then you’ll want your kit to be lightweight and easy to handle. If most of your disasters keep you in your home, then pack it away in your “storm safe” room (the best room in your house for a tornado or earthquake). There are many different lists out there to help you build your kit. I recommend finding one (even a basic one) and also including your Emergency Binder. You’ll learn
. It’ll take you 1 hour tops at Walmart to purchase your items (or you can buy them online), then another hour to put it together. It will save you so much time!
When planning your 3 day supply, be sure to include food you are familiar with eating, and cooking. Personally, we prefer Survival Bars. Our kids love them, and they save us from having to cook anything (which can be stressful when we are still trying to figure out what happened).
Step 4: A 3 Month Supply of Food Storage
Gather a 3 month supply of enough food for your family to use and eat. It’s easiest to start with 1 month, and progress to 3. The most important thing when starting to build up food storage is to buy what you eat. Read more about ———————>how to start and build your food storage <———————— since this can be a pretty lengthy topic (but totally worth it!)

Step 5: Water Storage
You want to make sure you have enough water stored for 1-2 weeks (since you should already have a 3 day supply with your 72-hour kit) for each member in your household. Depending on where you live (desert vs place with more rain) you’ll want to store 1-3 gallons per person a day. If you have chosen to store more freeze-dried foods, then be sure to add extra water for cooking with those. Read more about how to store water.
Start with a 3 day supply of food, then we’ll expand it in step 7. I’ve heard AWESOME reviews about this Big Berkey Water Filter System and have it on our preparedness wish list.
Step 6: Build an Emergency Fund
An emergency fund allows you to cover “emergency” expenses… without going into debt, or getting into bigger trouble. Read What is an Emergency Fund and How to Build an Emergency Fund for more information. I’m not talking about a LARGE emergency fund, just a small one, about $1000-3000. We’ll talk more about this in step 8.
Step 7: Use your Food Storage and Increase (and water storage) it to a 1 Year Supply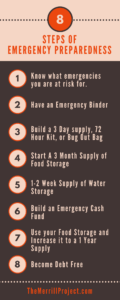
Progress your food storage to a full year supply. This may take a few years… which is OK. The last half of this step is to USE your food storage. Using while you build your food supply allows you to get used to it, cook with it, and learn how to use it in a larger variety of meals. If you aren’t sure how to do this, set up a FREE Food Storage Consultation, and I can help you out more.
You’ll also want to include enough ways to store/purify/filter water for enough water for about 3 months.
Step 8: Become Debt Free
Becoming debt-free is number 8 of the steps of emergency preparedness which allows you the freedom to buy what you need when you need it. It is something our church has recommended, and many other financial advisers. We believe there are 2 big steps towards becoming debt-free:
- QUIT spending money you don’t have (Read about how to stop recreational shopping)
- Create a budget, and learn how to stick to it and save. Download my printable budget worksheets, or purchase our electronic budget worksheets.
Once you are debt-free, then build your emergency fund to a whole 3 month supply of ALL of your expenses (food, utilities, mortgage, phone, etc).
In conclusion
5 Preparedness Class to get you better prepared FAST
Those are the 8 steps of emergency preparedness. There is probably a lot more to it than you thought it would be. Don’t get discouraged! Please! Just take it one step at a time. It has taken us 8 years to get this far, and we are still working and continually improving.
Emergency preparedness isn’t something to just do and forget about.
It’s something you work on, you teach your family about it, and grow with it as you grow. If you have some of these steps completed and not others, that’s ok. Just start back at 1 and work out a way up the ladder.
What step are you on? Comment below.
Further Reading:
How much food is enough for my family?
How to Build your Emergency Binder- Step by Step
If you liked this post, please let us know by leaving a comment below and clicking those share buttons to tell your friends. As always, we appreciate you taking a minute of your time to spread the word about preparedness.
This post contains affiliate links. Read my affiliate link disclosure here